Digital Photography: The Invaluable Tool for Increasing the Amount of Cosmetic Dentistry You Perform
by 6monthsmiles, on 5/19/16 2:49 PM
Clinical Mastery Series hosts dentists across the country in a variety of continuing education courses designed to improve restorative skills, business acumen, and practices. Our educators utilize their clinical knowledge in cutting-edge education programs on everything from mastering implant aesthetics to clinical photography and full mouth rehabilitation.
By Dr. Eric W. Jones
Looking to increase the amount of elective or cosmetic dentistry you perform? One of the tools I wish I had known more about when I was fresh out of dental school is digital photography. Since then, it has become the clinical tool that has most impacted my practice.
Detailed images can make a noticeable difference in your diagnosis, treatment planning, patient education, and lab communication. There is something to be said for a patient being able to visually observe the treatment you are suggesting. Aesthetic concerns that lead to the desire for short term orthodontics can often begin with a simple photo.
The Basic Settings for Dental Digital Photography
You may be intimidated by the litany of settings and set ups that seem to be required for photography, but in actuality with only a few concepts in mind you can begin to take good quality photographs useful in the practice.
You’ll want to start by purchasing a DSLR camera with a 100mm macro lens and a ring flash. This set up can be found at dental photography retailers or separately from online retailers and will total around $1,500.
Now we’ve come to the more nitty gritty details of manipulating settings to achieve the best quality photography. It’s fairly straightforward: Find and select the setting for “aperture priority” mode, which will be abbreviated as A or Av. You may have heard of it before under the name “F-stop.” The camera will then automatically select the best shutter speed.
The benefit of choosing this setting is that you will be able to control the amount of light the camera lets in and increase your ability to get all of the teeth in focus. Not only that, but you will only ever have to change the setting for full-face shots. For any others the settings can remain the same.
Ideally, you’ll want to begin incorporating photography into your practice with a focus on patients interested in aesthetic changes. Then, once you’re comfortable enough you can take basic photos of all patients.
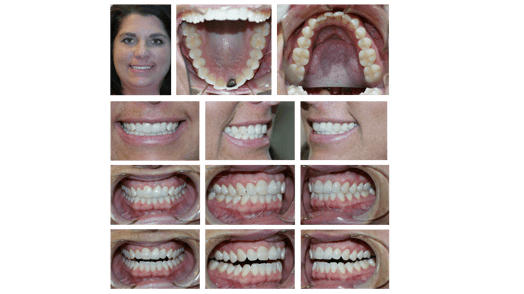
Four basic photos are the ideal jumping off point: a smile shot, a retracted shot with teeth apart, and pictures of the upper and lower arch. For assistance, all that is required is one clinical and the patient.
Soon, you’ll be on your way to more cosmetic cases and patients excited to see the changes in their smiles.
Bonus: Digital Photography Cheat Sheet
- Upper Arch, Lower Arch, Retracted, and Smile Shots
- F-Stop Aperture: 22 (or higher)
- ISO: 100 (or as low as possible)
- White Balance: “Flash” or “Cloudy”
- Flash Setting: ETTL (flash is automatically metered)
- Full-face and Portrait Shots:
- F-stop: -5.6-10
- All other settings can remain the same
CMS clinical faculty Dr. Eric W. Jones graduated from the Medical University of South Carolina College of Dental Medicine. He maintains a private practice outside of Atlanta, Georgia, focusing on achieving exceptional results for both simple and complex esthetic and functional problems.
To learn more about Clinical Mastery’s approach to improving the quality and quantity of restorative and cosmetic dental cases, go to our website at www.clinicalmastery.com.


